Wednesday, July 29, 2009

Handmade Wedding Part I: hankies!

ok, here it is, my first post about my semi-handmade wedding! with a glue-gun and sewing machine, i was able to make it something truly unique!

Handmade Wedding I: Hankies!
so as you know, i had my dress made for me by a wonderfully talented seamstress in indianapolis, sarah barrett. she had quite a bit of remnants leftover from the dress that she sent along to me, since she knows i sew. all in all there was the ivory silk for the main part of the dress, the silk lining, and the lacey beaded trim.

my dad says to me, "you could make a matching purse out of this for the wedding!"

good plan, daddy-o! except that i was going with a gold vintage theme, and had a (yes, you guessed it) gold vintage purse to carry that day.
SOOO...i decided to make...hankies! for my parents, jamie's parents, and both of us (counting...2...4...5,6..yep that's 6!). i set up a little assembly line and got stitchin'!
All lined up and ready to go:

i cut a 8x8 inch square of both the main silk and the liner, and sligned them right-sides-together. then i added a 3inch piece of trim diagonally across one of the corners, between the main silk and the liner. pin in place!
then i sewed all around the perimeter of the hankie, leaving about an inch opening. be sure to backstitch at the beginning and end (around the inch opening). it makes turing the hankie a lot easier.

after i turned each, i pressed each one flat (not ironed! what's the difference?).

after pressing each hankie, i returned to the machine and again sewed around the perimeter, carefully tucking the 1-inch opening inside, closing off the hankie.


(like my ring? there's a wedding band with it there now :)

back on track - when the whole perimeter was stiched, i snipped threads and ta-da!


look how pretty that is, eh? so i folded them up and packed them real pretty-like into thier own boxes, with pretty little ribbons. (of couse i neglected to photograph this part, but just imagine...)

i pinned mine to the handle of my bouquet like so:


happy sewing!

♥E

Tuesday, July 28, 2009

Toot Sweet Re-Launch is coming...

i've decided to re-launch my shop on etsy! how exciting, right? i'm moving towards more of a design-your-own-bag type of shop, with add-ons and customizations. i am going to offer my best-selling designs, and YOU will be able to customize each to your liking!!

so here we go - new beginning, new start, new list of things to do!

♥ make a new lightbox - bigger, better, more kitten-proof! i'm thinking either one like this or like this. then take new pics of the inside of my bags.

♥ order new business cards with my new motif

♥ go thru my whole sewing room and organize, label, purge old stuff

♥ promote! advertise in local coffee shops and businesses, plus post on other etsians' blogs. and tweet tweet!

♥ revamp the format of my listings and tags and the way i list items - i'm thinking database

♥ offer free shipping!! woo hooo!!

♥ photo-swatch each of my available fabrics and upload to my flickr.com fabric site- this will make choosing fabrics for custom bags super-easy!


i'm sure there is more, but this is quite the list, eh? so visit back and i'll let you know how i'm doing, while posting about some fun projects along the way :)

♥E


Monday, July 27, 2009

I'm Baaaaack!!

helllooo!!

well. i've been gone for awhile, and it seems quite unexpectedly, but let me tell what i did in my hiatus:

i got married!! yep, that's us below:


we've gone on our honeymoon and written our thank you notes. now it's back to real life ;)

i'll probably be blogging a bit about the wedding so there will be a few crafty/sewing wedding related posts up here coming soon. hope you like and enjoy!

♥E

Thursday, April 30, 2009

my favorite colors for spring

spring has sprung! especially here in florida, where it's already getting to 85 degrees F everyday, the fresh air of spring is filling our thirsting lungs :)

so it's time to talk about the best colors for spring. i have to admit, i love PINK! my philosophy: "for every occasion, there is a shade of pink to match". for spring, i love pale pinks and bubble gum pinks.

and to go along with the pink?? why, green of course! but not just any green, grass green. bubble gum pink with grass green just reminds me of a watermelon - juicy :)

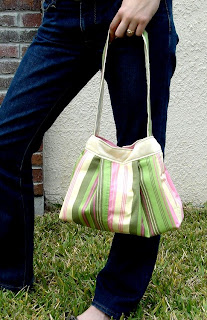
that being said, check out my newest kari bag:


and the matching wristlet:

if you can believe it, the striped fabric used to be a pair of pants. that's right, pants. much better when used for handbags, agreed? :)

hope spring is coming around for you!

<3e

Monday, April 20, 2009

Etsy For Charity!

recently while shopping, i have come across quite a few shops that give at least a portion of their proceeds to charity. some i have already partaken in, but there are a bunch out there that need representation. so here's what i'm gonna do. i'm setting up a sidebar item dedicated to Etsy shops that give to charity. check back often to see the latest adds!

if YOU are an Etsy shop that donates part of your proceeds to charity, please contact me so i can add you!

♥E

Tuesday, April 14, 2009

Avatar Stratergery

i suppose i should preface this by saying that there are three general schools of thought when choosing an avatar picture for an etsy shop:

1) a picture of myself, ie. the artist, which i have been using for awhile - it might make people click if they think you are pretty, plus you don't have to change it ever, unless you drastically change something about yourself, but then again, how would they know?

2) a picture of my logo - good for cohesion between etsy, blogging, twitter, etc. and my product logo. basically the ultimate way to brand your line - plus you dont need to change it unless you change your logo.

3) a picture of a product i sell - probably will make people click if it is a well-photographed item that is interesting and they want to buy it. the downside is that it really should be something that i sell in my shop, so if i sell that item, i need to change out my avatar, thus causing a break in the cohesion of my avatar over time.

well today decided to take that risk. i changed my avatar on etsy from my black and white profile pic shown above to be a product that i carry in my shop (the ever-popular texas tote):

and now we wait...and see if this causes more clicks from the forums and other places. i know this gem would make me click! what about you?

♥E

Thursday, April 9, 2009

my top three simple sewing tips

as i was sewing last night, i realized that i have really evolved as a seamstess over the years. of course there are areas where i can improve, but otherwise, being mostly self-taught, i realized that there are three basic things that all sewers need to know.

here are my top three simple tips for making sewing easier:


1) press your fabric. no, don't iron it! ironing is a back and forth motion, pressing is laying or folding the fabric how you want it, and then laying the iron on it for a few seconds. by running the iron back and forth (ironing), you will push and pull the fabric with the iron, causing your fabric to deform from how you laid it. by pressing your fabric, especially the folds and pleats, you will have a much easier time sewing along them, and won't have to use as many pins...


2)...which brings me to pinning your fabric. i think that many sewers find pinning to be overrated. pin everything! it keeps all the layers of fabric together, straight, and avoids shifting under the presser-foot. remember to remove each pin as you come towards it with the needle, lest you hit it with the needle: this can cause the pin to bend and (worse) the needle to break. sometimes, when i am using a very large width stitch, i will sew carefully over the pins...


3) ...and when would i use a very large width stitch? if you like pleats and layers, the best thing to do is to baste them in place. the word "basting" takes me back to when i would read the little house on the prairie books, when the ingalls girls would baste by hand then hand off the garment to their mother to machine-sew. nowadays, many machines have a basting stitch that is simply a very wide width stitch that can be set to a loose tension. the concept is to first press and pin your garment, then baste the garment along a pleated area or area that has many layers. this way as you work with it more, it will already have that area set in place, regardless of what your future steps are for the rest of the garment. just keep in mind that basting is not for seams!

well i hope this helped and did not confuse! remember : press, pin, baste!

now, go get sewing!

♥E